Mix Puppet and CloudFormation to automate your Bonita BPM deployments on AWS
Objectives
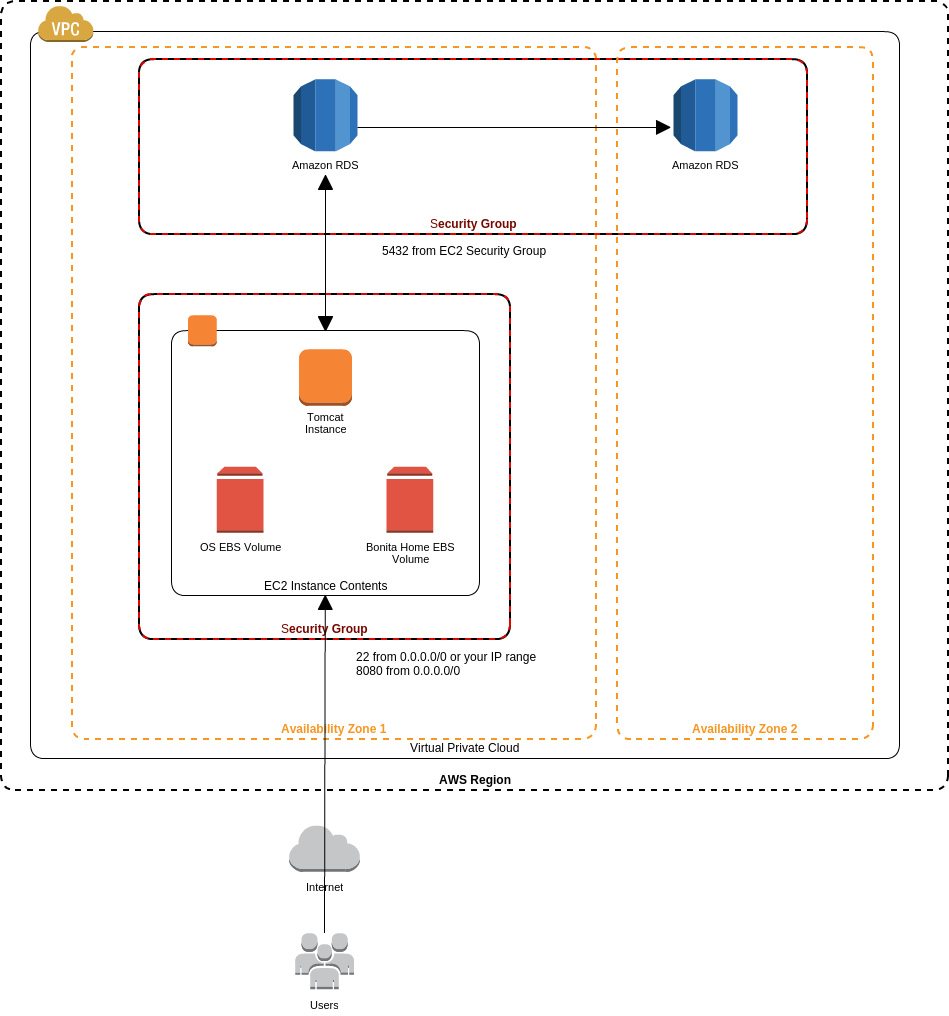
As promised in a previous tutorial I would like to show you how to mix AWS CloudFormation and Puppet to automate your deployments on AWS.
A new CloudFormation template has been created for this.
You can install an EC2 server with 2 EBS volumes:
- one for the OS
- another for Bonita Home (so we can use snapshots to back it up)
You can automatically deploy an RDS instance running PostgreSQL with a multi-AZ option (you can choose to disable this if you don't need replication).
Both EBS volumes and the RDS instance use General Purpose SSD for predictable cost (no fees depending on IOPS) and good performance :
Baseline performance of 3 IOPS/GiB (up to 10,000 IOPS) with the ability to burst to 3,000 IOPS for volumes under 1,000 GiB.
This template automatically retrieves the Puppet module from bootstrap on GitHub.
The result is represented in the following diagram :
Deployment
To follow this tutorial you need to sign up for an AWS account first.
The CloudFormation template is available on GitHub.
Then start the AWS console and go to CloudFormation.
Click on the "Create Stack" button.
Define a Stack name: "bonita652community" (the stack name will be used to set the EC2 hostname)
Upload the template file: BonitaBPM_Puppet_PostgreSQL_RDS.template
Click on the "Next" button.
The minimum parameters needed are:
- BonitaDbPassword for this example we will use "bonitadbpass"
- KeyName select the Key you will use for ssh access to the EC2 instance
- LogsPassword for this example we will use "logssecret"
- PlatformPassword for this example we will use "platformsecret"
- TenantPassword for this example we will use "tenantsecret"
I also recommend to reduce the SSH access from anywhere (default 0.0.0.0/0) to your IP/32 into SSHLocation parameter.
Click on the "Next" button.
You can add tags if you want or just click on the "Next" button.
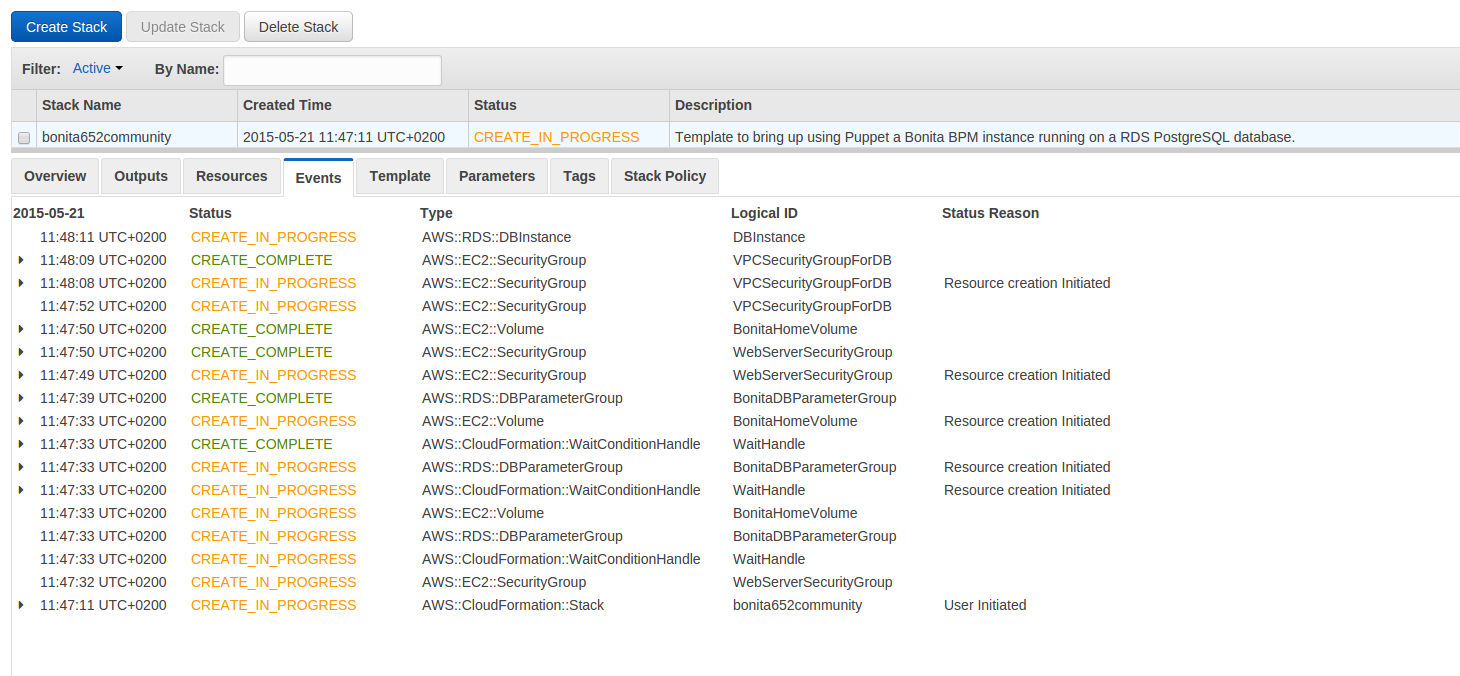
You can now see that the stack Status of "bonita652community" is "CREATE_IN_PROGRESS".
When it displays CREATE_COMPLETE you can go into the "Outputs" tab and click on the link provided: YOUREC2:8080/bonita
It's not a sexy name and you can manually create a CNAME to hide it if you have your own domain name, or even better, you can modify this CF template to automatically manage your DNS using Route 53.
Using the link above you can log on YOUREC2:8080/bonita with tenantadmin / tenantsecret (if you use the same values I have used).
You can access to the tomcat logs using YOUREC2:8080/logs/ with logsuer / logssecret (if you use the same values I have used).
To connect using ssh the login is "ubuntu".
Backup & Restore
Backup
To ensure you perform a consistent backup you need to ssh your instance and stop tomcat:
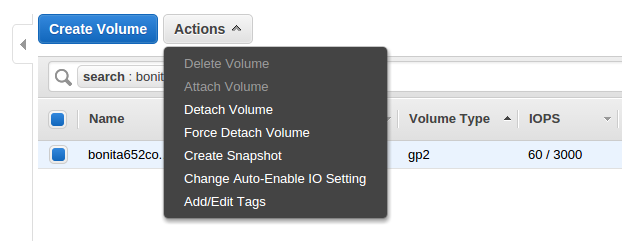
Go to the AWS Console in the EC2 service, select Volumes, and search for bonita652community.
You can see in the "Tags" tab that aws:cloudformation:logical-id value is "BonitaHomeVolume".
On the top select "Actions" and choose "Create Snapshot".
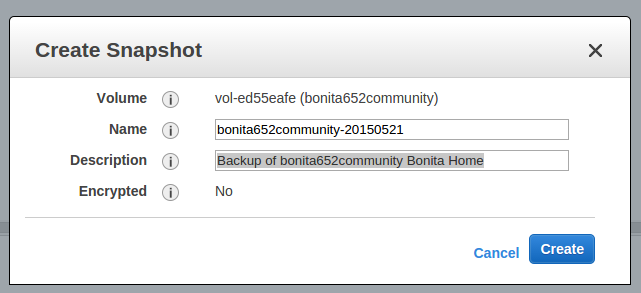
Choose a "Name" for example "bonita652community-20150521" and a "Description" for example "Backup of bonita652community Bonita Home".
And click on "Create."
Wait until the corresponding snapshot status changes from "pending" to "completed".

Go to RDS service, click on "Instances", select your instance (the one with the security group beginning with "bonita652community-VPCSecurityGroupForDB").
Click on "Instance Actions", select "Take DB Snapshot".
Define a "Snapshot Name", for example "bonita652community-20150521".
Click on "Take Snapshot".
Wait until the corresponding snapshot status changes from "creating" to "available".

Then you can restart tomcat:
You can also automate this using cron and some calls to AWS APIs.
Restore
In necessary, you can reinstall a stack using the snapshots.
Click on the "Create Stack" button.
Define a Stack name : "bonita652community2"
Upload the template file : BonitaBPM_Puppet_PostgreSQL_RDS.template
Set the same parameters than described above except for :
- BonitaHomeSnapshotId - in this example I used "snap-da963b8d"
- DBSnapshotIdentifier - in this example I used "bonita652community-20150521"
- RestoreFromSnapshots - select "true".
Then create your new stack.
I hope you will enjoy this new template and have fun with Bonita! :)