Customize your GMF editor by customizing templates
During the development of BOS Studio, which is a technology nominee for Eclipse Community Awards, the BonitaSoft R&D team has customized GMF editors. I will share what we did and show how to apply it yourself.
One way to customize your GMF editor is to modify the XPand templates. GMF provides a convenient way to do it. This post will explain two ways to take advantage of this method. To illustrate, I will show you how to set a custom SelectionManager in the editor.
Import GMF templates and customize them
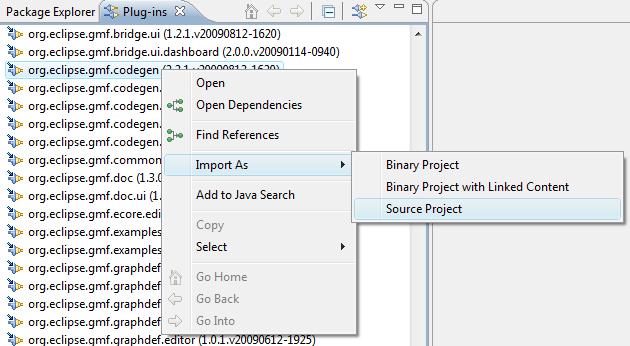
- First, import the base templates used for GMF generation. You can get them from the templates folder in org.eclipse.gmf.codegen plugin. Open plug-in view, right-click on the plugin and import it as source project:
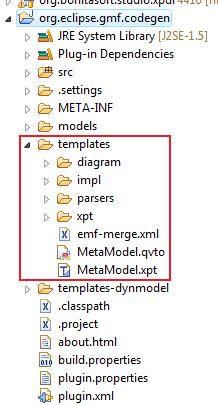
- Now you can see the templates in your workspace:
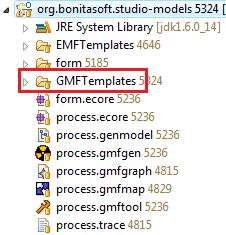
- Create a folder which will contain your customized templates:
- Find the file that you want to customize. Be sure to use the same hierarchy for your customized templates folder. For instance, take the Editor.xpt file:
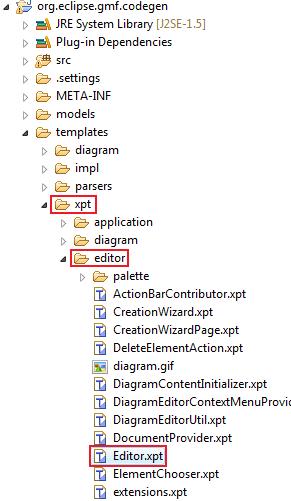
and put it in the corresponding folder: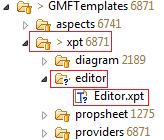
- Customize the template by modifying the DEFINE block that you want. For instance, to add your own SelectionManager, modify the configureGraphicalViewer DEFINE block:
«DEFINE configureGraphicalViewer FOR gmfgen::GenEditorView-»
«EXPAND xpt::Common::generatedMemberComment»
protected void configureGraphicalViewer() {
super.configureGraphicalViewer();
«EXPAND xpt::editor::DiagramEditorContextMenuProvider::qualifiedClassName FOR editorGen.diagram» provider =
new «EXPAND xpt::editor::DiagramEditorContextMenuProvider::qualifiedClassName FOR editorGen.diagram»(this, getDiagramGraphicalViewer());
getDiagramGraphicalViewer().setContextMenu(provider);
getSite().registerContextMenu(org.eclipse.gmf.runtime.diagram.ui.actions.ActionIds.DIAGRAM_EDITOR_CONTEXT_MENU, provider, getDiagramGraphicalViewer());
«REM»Disable multiple selection for PREVIEW «ENDREM»
getDiagramGraphicalViewer().setSelectionManager(new org.bonitasoft.studio.common.diagram.tools.BonitaDiagramSelectionManager());
}
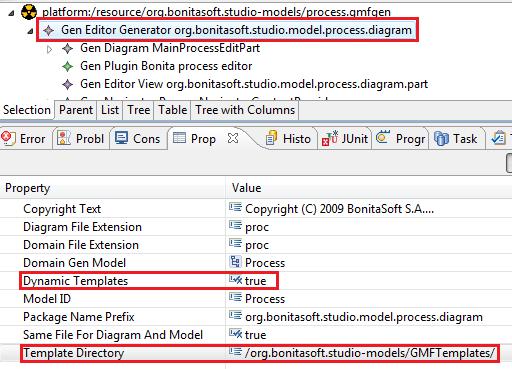
«ENDDEFINE» - For the GMF generator to use your custom templates, there are two attributes to set in the gmfgen file: - Set Dynamic Templates value to true - Set Template Directory value with the platform path to the folder which contains your customized templates:
And now for the elegant solution
Ok, now you know how to customize your templates. Let's go further - learn how to customize them more efficiently. You can use aspects to do this. Aspects allow you to override just a part of the template. This avoids duplicate code, is easier to read, more efficient to maintain and easier to upgrade. Yes I, and the Bonitasoft R&D team, recommend this way ^^
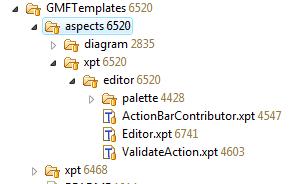
- In order to do this, create a folder named “aspects”. Put your customized template into it, again respecting the hierarchy:
- The customization is not exactly the same. This time, pick up just the DEFINE block that interests you, replace "DEFINE" with "AROUND" and then modify the contents of this block as above. This way, you have only the modified part of the template in the file. This is much clearer :
«AROUND configureGraphicalViewer FOR gmfgen::GenEditorView-»If you want more examples, take a look at the templates used for Bonita Open Solution Studio. They are available on the github repository. And all your comments are welcome :)
«EXPAND xpt::Common::generatedMemberComment»
protected void configureGraphicalViewer() {
super.configureGraphicalViewer();
«EXPAND xpt::editor::DiagramEditorContextMenuProvider::qualifiedClassName FOR editorGen.diagram» provider =
new «EXPAND xpt::editor::DiagramEditorContextMenuProvider::qualifiedClassName FOR editorGen.diagram»(this, getDiagramGraphicalViewer());
getDiagramGraphicalViewer().setContextMenu(provider);
getSite().registerContextMenu(org.eclipse.gmf.runtime.diagram.ui.actions.ActionIds.DIAGRAM_EDITOR_CONTEXT_MENU, provider, getDiagramGraphicalViewer());
«REM»Disable multiple selection for PREVIEW «ENDREM»
getDiagramGraphicalViewer().setSelectionManager(new org.bonitasoft.studio.common.diagram.tools.BonitaDiagramSelectionManager());
}
«ENDAROUND»