You want to contribute to Bonita UI Designer widgets... It's easy, follow me!

The Bonita platform offers a graphical web UI editor called Bonita UI Designer. If you use, or plan to use, Bonita UI Designer to develop pages for a process application, you may want to create custom widgets - and this article is for you. It is based on the real experience of our team developing web applications with Bonita UI Designer.
We struggled with one of the provided widgets whose behaviour did not exactly fit our requirements
Our front-end team was recently developing new application pages using Bonita UI Designer, and we struggled with one of the provided widgets whose behaviour did not exactly fit our requirements: the Autocomplete widget.
We had an API returning a list of json objects representing users of the platform, with all properties for each user (id, first name, last name, etc). In the Autocomplete widget, we wanted to be able to query this API and display a list of users matching the characters typed in the suggestion box. When one user was selected, we wanted to return the full user json object and not just the displayed username value.
But the provided Autocomplete widget could only return the display value, not the full object.
We had to face a choice: working around with custom widgets or contribute to the UI Designer
Working around without custom widgets
As the provided widget did not have the capabilities we needed, we faced a choice. We could:
- Change our design to make additional API calls to retrieve the full user object when an entry is selected in the suggestion box.
This solution isn’t very appealing in terms of design and performances and can be a source of bugs - Implement a custom widget with this exact behavior.
But this would mean we have to test and maintain a new widget, which will have almost the same code and functionalities as the existing Autocomplete widget. This surely isn’t very satisfying. - Look in Bonitasoft community contributions for a custom widget that could work.
There seems to be one, but if we choose to use it, we’ll need to test it (as the contribution doesn’t seem to have tests) and then maintain it once it’s integrated in our page. - Use the existing widgets and UID capabilities to mimic an autocomplete widget, but with the behaviour we need.
This solution offers the benefit of not having to maintain any new custom widget.
This last one is the solution we choose to implement. We associated an input widget with a repeatable container, to display as a button each user returned by the API call as a suggestion. We were able to work around the existing widget like this, but of course depending on the requirements, this is not always possible! In some cases you might need to modify the HTML template of the widget.
So we managed to implement the page as we wanted, but while developing other pages we realized that the autocomplete widget was a pretty usual one as we continued to find a need for it. So why not contribute this improvement to the Bonita UI Designer as a useful addition?
Contributing to the UI Designer
To contribute to the Bonita UI Designer, you need first to fork the repository bonita-ui-designer on Github, and use your favorite IDE to edit the source code. As a reminder:
- Use the “dev” branch as the base branch for your pull request when you want to improve something or contribute something new.
- Use the “master” branch as the base branch for your pull request if you want to fix something, as this is the branch used for maintenance releases.
Now that your repository is forked, the next steps are:
- modify the widget
- update the unit tests
- write the migration step (if needed)
- update the end to end tests
- open the pull request
I will describe them one by one.
Modify a widget
The source code of the provided widgets is located in backend/webapp/src/main/resources/widgets.
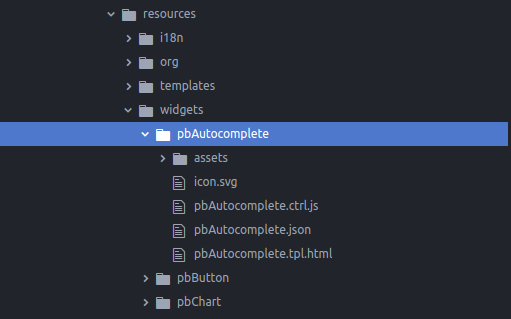
For each widget, there is an HTML file for the DOM, a js file for the controller, and a json file containing the properties available in the properties panel of the UI Designer when you place the widget in a page. There may also be some js and css assets.
An easy way of testing the modifications you make to a widget can be to modify it directly in the Bonita UI Designer:
- Run the UI Designer using the command “./server.sh” at the root of the project, and in a web browser, go to http://localhost:3000/
- In a new page, drop in the widget you want to modify, and use the action “View...” in the top right corner of the properties panel of the widget. It will open it in the custom widget editor.
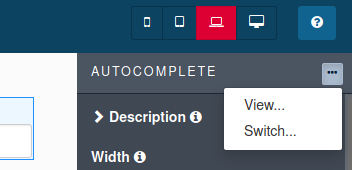
- Then save it as a new custom widget, and use this new widget to test it in a page. You see the documentation about custom widget development for more detail: https://documentation.bonitasoft.com/bonita/7.11/custom-widgets
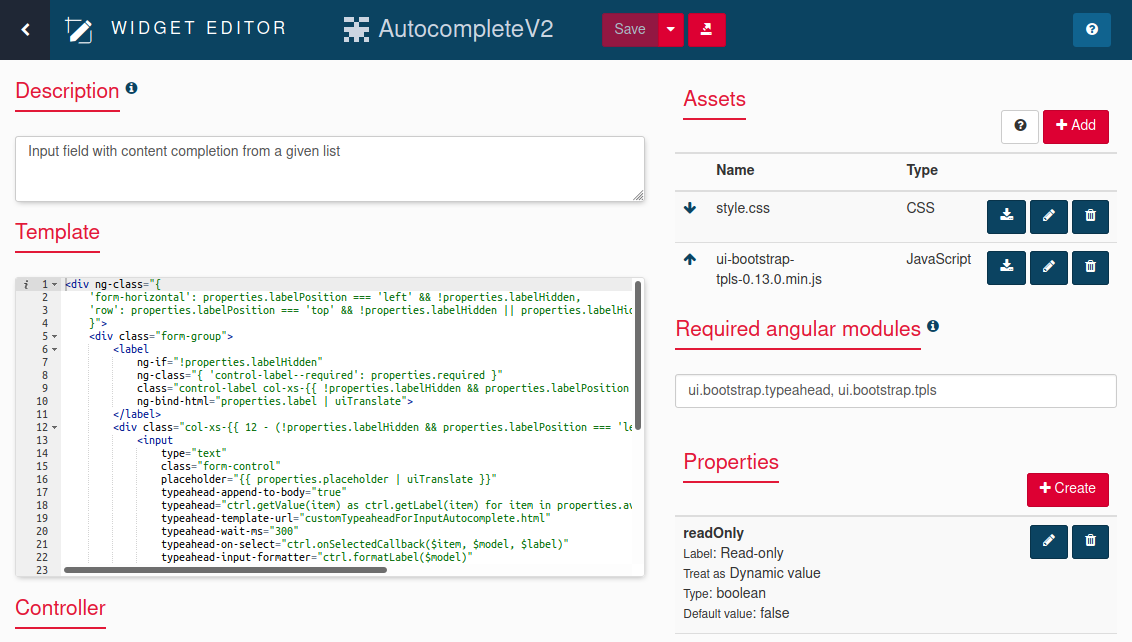
Note: Please keep in mind that the modifications you make to the widget must not change the existing behavior, otherwise the migration may be impossible. You may add something new, but never modify the existing behavior (unless you are fixing a bug).
Once you are satisfied with the behavior or your widget, you can export it and report the changes you made in the directory of the widget in your forked repository.
Update the unit tests of the widget
You will next need to update the unit tests of the widget to cover the new behavior. They are located in backend/webapp/src/test/javascript/spec/widgets.
As you can see, there is one test file for each widget. Make sure the existing tests still pass and add new ones if needed.
To run the tests, the easiest solution is to run ./mvn clean package at the root of the project to build everything once (this includes launching the unit tests) and then launch yarn run test in the directory backend/webapp to run only the runtime javascript tests. (You'll need to install Node.js and yarn for this).
The autocomplete widget was a pretty usual one as we continued to find a need for it. So why not contribute this improvement to the Bonita UI Designer as a useful addition?
Write the migration step (if needed)
If you changed anything in an existing widget, there is a high probability that you will need to write a migration step. Migration allows someone who developed a page in an older UI Designer version to import it in the current version without breaking anything, and to keep the same behavior in the page.
The migration steps are written in Java and located here : backend/webapp/src/main/java/org/bonitasoft/web/designer/migration/page
One way to know if a migration step is needed is to imagine what will happen if the provided widget is replaced by the new version in an existing page. Usually, it is a matter of filling in the new properties that may have been added to the widget.
If keeping the default value of those properties would not change the behavior of the widget then you may not need a migration step.
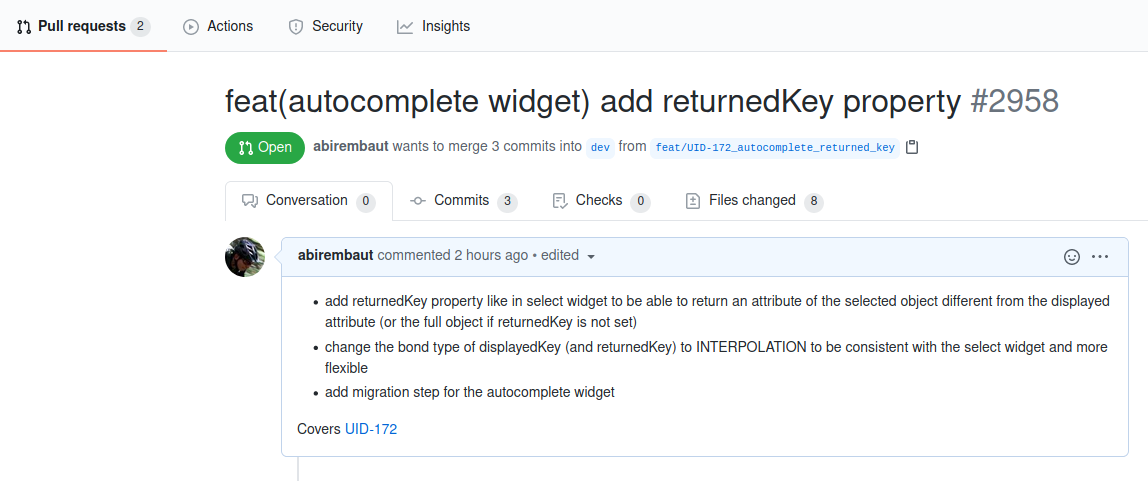
Here is an example of migration step that copies the value of a property into a new property, and changes the type of the old property: backend/webapp/src/main/java/org/bonitasoft/web/designer/migration/page/AutocompleteWidgetReturnedKeyMigrationStep.java.
Once the migration step exists you need to add it to backend/webapp/src/main/java/org/bonitasoft/web/designer/migration/MigrationConfig.java with the current UI Designer modelVersion. The migration step will be executed only if the page has been built with a version older than this one. You can find the current model version in the pom.xml at the root of the project (look for the property uidModelVersion).
Update the end to end tests (widget in a page)
The last development step is to update the end to end tests to make sure the widget behaves as expected in a page.
End to end tests are located in tests/src/test/spec/pages.They are implemented using the Protractor test framework.
The easiest way to run them is to launch /mvn verify -Pe2e at the root of the project or or yarn run test in the directory “tests” of the project.
For each widget test, there is a page .json descriptor used to setup the widget in various test situations. It is located in tests/src/test/resources/pages.
You may need to modify this page descriptor to test a new usage scenario for the modified widget. You can use the UI Designer to do so (just package the page .json in a zip and import it in a running UI Designer).
Create the Pull Request
When you are done with the tests, you can commit your changes, push them and open your pull request on the bonita-ui-designer repository.
The commit message needs to follow the rules described here.
Once the pull request is open, it will be reviewed by the UI Designer development team.
The same procedure (with some variations) can be used to contribute other new widgets to Bonita UI Designer, but it is a good idea to discuss your contribution idea with the UI Designer development team first (use the Bonitasoft Community Q&A) and this is a topic for another article!