Trello Application Example – part 2
In this article, we would like to share with you a example of a nice Bonita BPM application using Trello.
Here is a summary of what it does:
- Helps you create credentials to connect Bonita BPM to a Trello API
- Retrieves JSON information from a Trello board
- Creates a downloadable CSV and displays the table in a Bonita BPM form
- Stores the credentials, so you can use them later when starting a new case from the application in the Portal.
The first part of this article was aimed at the beginner. We reviewed the example, saw how to set up a subprocess, and showed how to store credentials.
In the second part, aimed at the developer, we will see how the Trello Connector has been designed in Bonita BPM Studio. We need to create a custom connector in order to:
- Connect with Trello API to get Trello Board Info
- Transform it (JSON array) into a list, which we will need to populate our table widget, and
- Transform it into a CSV formatted string to generate the content of the downloadable file.
While doing thing, you can:
- Understand better how connectors work in Bonita BPM
- Understand how to generate a Bonita BPM document from process content
Connector Structure
First, let’s look at the structure of a connector in Bonita BPM. It has two parts, Definition and Implementation.
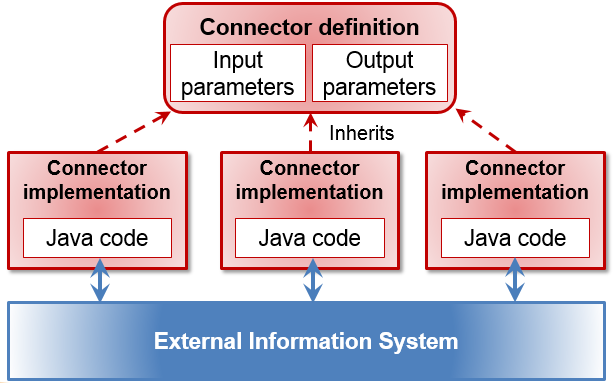
The definition will allow us to define inputs and outputs of our connector. We will define the way we are going to ask for the input data, and defined the pages of the widgets which we will show to the user who will actually populate it to give the inputs required to execute the connector itself.
The implementation will be the Java code which will be executed with the inputs and outputs defined in the definition. Keep in mind that we can have several different implementations for the same definition. Imagine that your company has developed some custom connector to retrieve and create invoices into your ERP, and now you are going to change the ERP. You need to re-implement your connector. With the community version of Bonita BPM, you can redeploy the process using the new implementation of the connector. If you have a Subscription Pack your processes are not going to be affected, as you will able to change the connector implementation in runtime and if your processes get stuck, you can relaunch the execution of previous tasks with the new implementation.
Create a Trello Connector
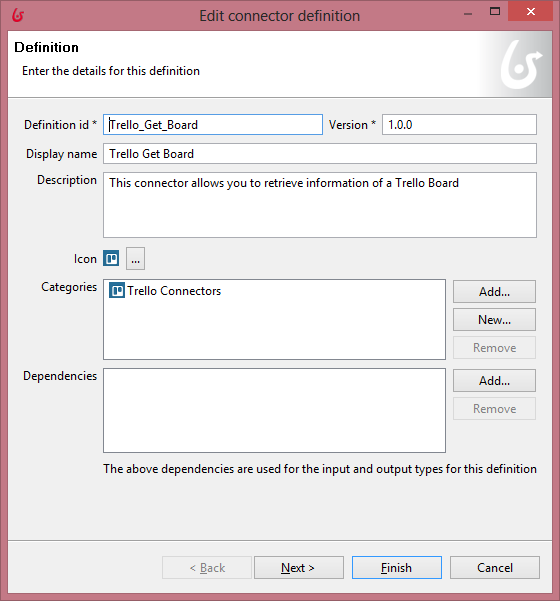
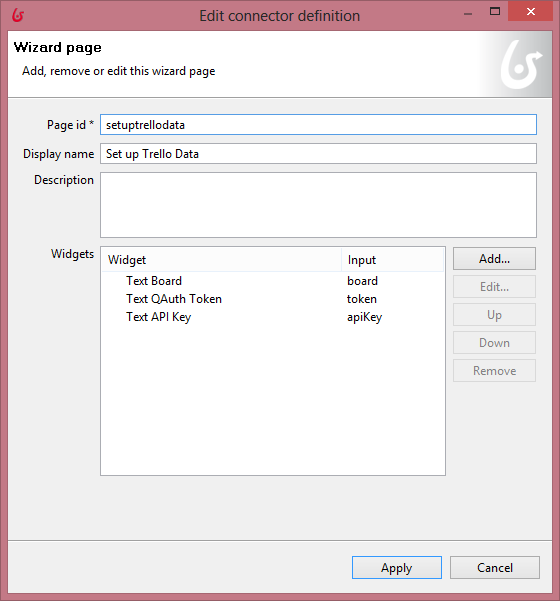
To get our connector working from scratch, we have to create a new definition from Bonita BPM Studio (see Figure 2). With the development menu you can create a new connector definition. In this case, we will need 3 different inputs:
- The Trello API key,
- The qAuth token and
- The board we want to show.
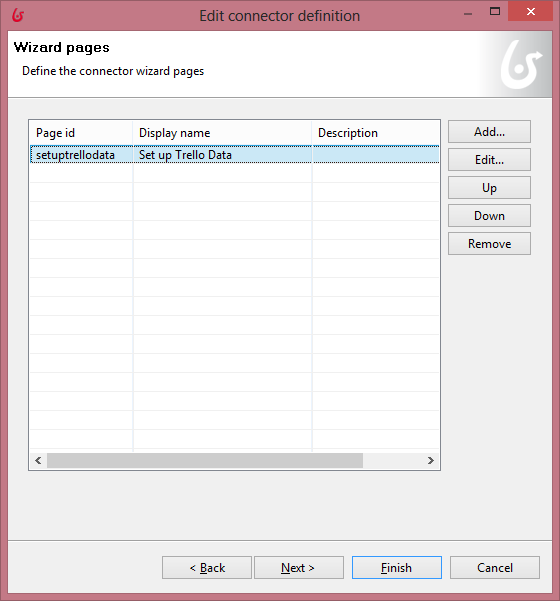
So we define these inputs as text (string) and a wizard page with text widgets to let the user set up the connector.
As you can see, we’ve defined a custom category to store this connector with its own icon. You can define your own category to store your custom connectors.
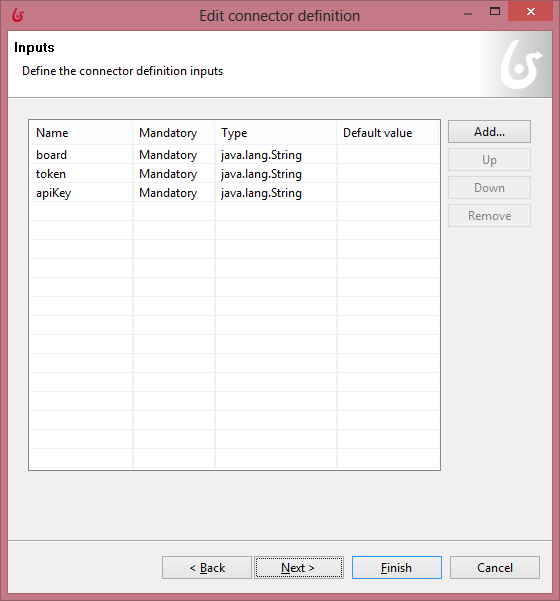
Now we need to define the connector’s outputs. In this case we will output several data:
- The content of a csv file stringCSV
-
The content of the board in a List
-
The headers of that table widget with a List
bonitaColumn, -
And a List
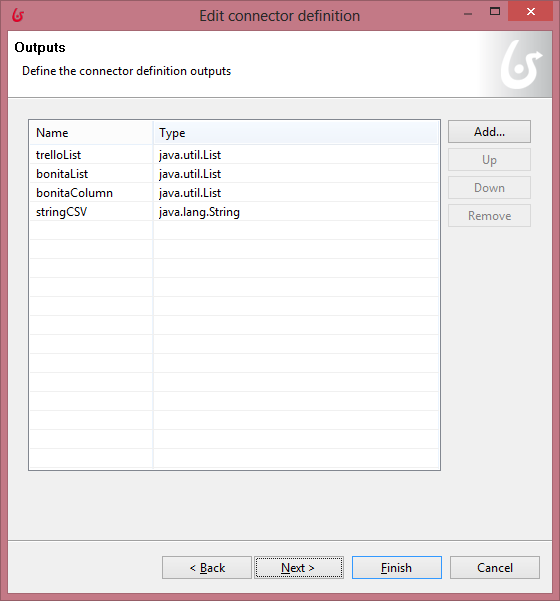
Later in this blog post we will show how to manage these outputs and how to give our connector the inputs required from a variable, either a constant or a script.
Now we have our connector definition fully designed, so the next step will be to create the implementation. This will connect to the Trello API to retrieve the data inside the board, and will transform it to objects easier to manage inside our process - a table and a CSV file ready to download. In summary, we will use inputs to generate our outputs through a piece of code written in the connector implementation. You can create a new connector implementation or edit this one in the development menu > connectors >edit connector implementation.
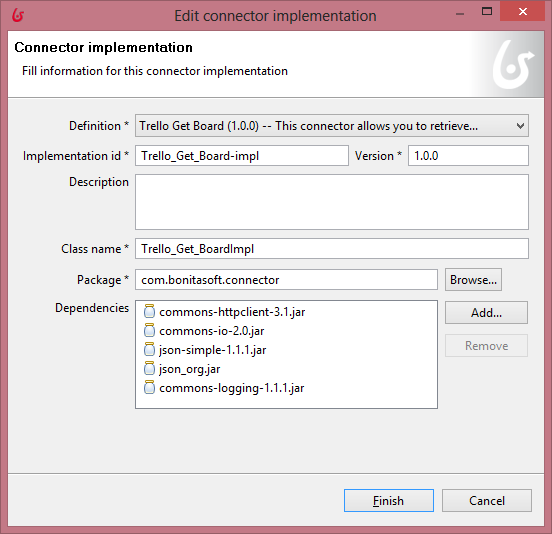
First we will setup the definition we are going to implement by defining:
- Name of this implementation and of the class that we are going to create,
- The package where we will do this,
- The version, and
- The dependencies that we will need in our connector code.
In this case we need
- common-httpclient
- common-io
- json-simple
- json_org and
- common-logging.
Once we press Finish, we will be redirected to our new Java file in which we will write our own code. But first we have some general remarks:
Your new class will extend an abstract class automaticly generated too, in our case:
.
This abstract class will manage all inputs and outputs set in the definition, and the default validation of the inputs which will check the type of value given as input. So the way to access to the inputs from our class will be through get methods, and you will have to return the outputs with set methods.
In Figure 5 you can check which methods will be executed and in which order:
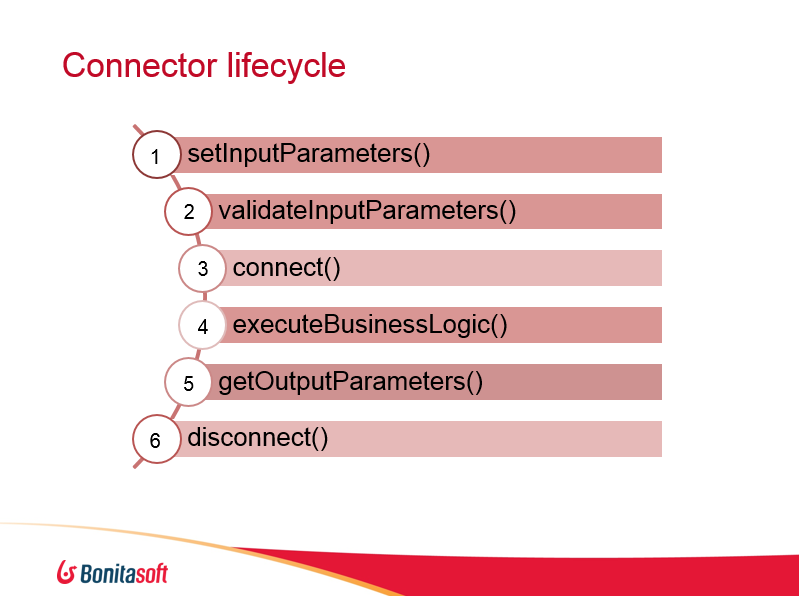
- setInputParameters() –> the connector receives input parameter values
- validateInputParameters() –> the connector can validate input parameter values
- connect() –> the connector can establish a connection to a remote server (if necessary)
- executeBusinessLogic() –> execute the connector
- getOutputParameters() –> outputs are retrieved from connector
- disconnect() –> the connector can close connection to remote server (if any)
Connect and disconnect methods are optional: they are used when the targeted system uses “connected objects,” for instance a datasource. We open the connection (connect method), we execute actions, and we close the connection (disconnect method).
Remember that you can manage several implementations of the same definition, and after that select which one will execute in your process
You can check the code we developed for this connector in our Community GitHub repository, feel free to reuse it.
Managing outputs
We finished creating our connector and we used it in a task to retrieve data, but how to manage lists of content and headers, and the CSV content?
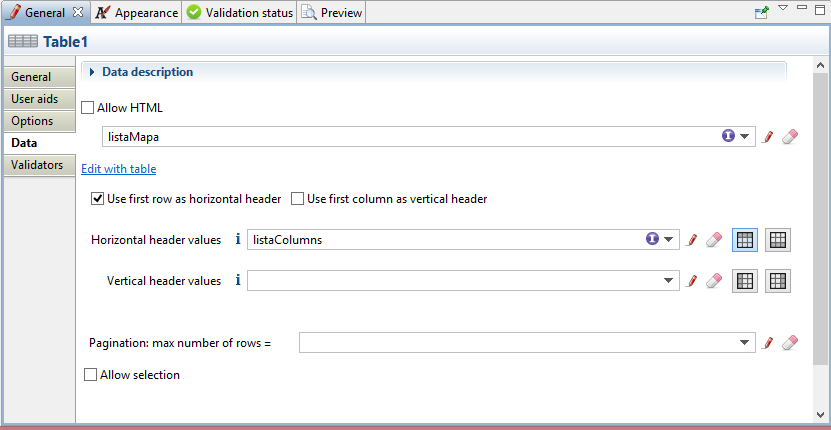
We will start with easiest one first. In the previous explanation we spoke about both lists (bonitaList and bonitaColumn) so we are going to use that output to fill two variables and put it into a pageflow. To do this, in our pageflow we will define a new table widget and populate it with the variables. I previously filled in the connector output, as initial value and as horizontal header values respectively. Now we will have our table with the Trello board data.
But how to convert the formatted string to a Document?
First define a new document in the process. To do this, for that click in the pool, go to documents, and create a new document in there. In this case it should be a MIME Type “application/csv.” Then we will “write” the content generated by our connector into this document, and for that we will need to use Operations where we can manage this document variable. We will use a script to return an org.bonitasoft.engine.bpm.document.DocumentValue, which will be stored in the document.
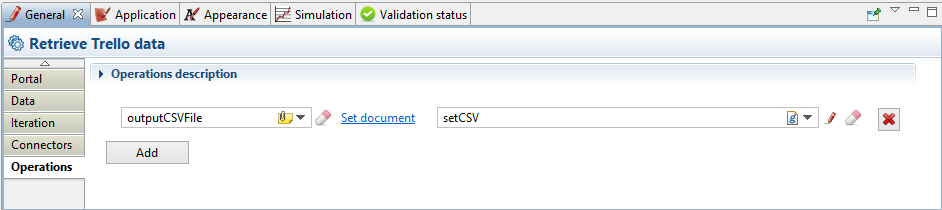
return new DocumentValue(stringCSV.getBytes(), "application/csv", "trello_board.csv");
And there you have it!