How to enforce the jvm version to be used by and in the Bonita Studio?
Component: Studio | Version: N/A
If you use several JDK versions on your computer, you might want to force the Studio to use a specific version. You can have several versions of the JDK installed in your system at the same time, for example: the latest Oracle JDK 11.0.6 set as your system's default version, for all applications to use (except the Bonita Studio 7.10.4) OpenJDK 11.6 (jdk-11) for the Bonita Studio 7.10.4.
Change the Studio configuration
This will change the JVM used to start the Bonita Studio.
In Windows Note: This procedure works for Oracle JDK and OpenJDK
1. Edit the file: BonitaStudioSubscription64.ini(orBonitaStudioSubscription.ini depending on your install)
2.a. If you use Bonita versions 7.8.x or lower: after the line --launcher.XXMaxPermSize512m line, add the following 2 lines (must be written on 2 lines, where \path\to\jdk-11\bin\javaw.exe is your path to Java):
-vm
\path\to\jdk-11\bin\javaw.exe
2.b. If you use Bonita versions from 7.9.x or higher: before the line -vmargs, add the following 2 lines (must be written on 2 lines, where \path\to\jdk-11\bin\javaw.exe is your path to Java):
-vm
\path\to\jdk-11\bin\javaw.exe
3. Run your Studio
In MacOS
1.a. If your use Bonita version 7.7 and lower, edit the file BonitaStudioSubscription.ini (the installer uses /Applications by default as your
BonitaStudioSubscription.ini (the installer uses /Applications by default as your
2.a. If you user Bonita versions 7.8.x or lower: after the <strong>line</strong> --launcher.XXMaxPermSize512m line, add the following 2 lines (must be written on 2 lines, where /path/to/jdk-11/bin/java is your path to Java):
-vm
/path/to/jdk-11/bin/java
2.b. If you use Bonita versions from 7.9.x or higher: before the line -vmargs line, add the following 2 lines (must be written on 2 lines, where /path/to/jdk-11/bin/java is your path to Java):
-vm
/path/to/jdk-11/bin/java
3. Run your Studio
In Linux Note: This procedure works for Oracle JDK and OpenJDK
1. Edit the file: BonitaStudioSubscription64-linux.ini (or BonitaStudioSubscription-linux.ini depending on your install)
2.a. If you use Bonita versions 7.8.x or lower: after the line --launcher.XXMaxPermSize512m line, add the following 2 lines (must be written on 2 lines, must be written on 2 lines, where /path/to/jdk-11/bin/java is your path to Java):
-vm
/path/to/jdk-11/bin/java
2.b. If you use Bonita versions from 7.9.x or higher: before the line -vmargs line, add the following 2 lines (must be written on 2 lines, where /path/to/jdk-11/bin/java is your path to Java):
-vm
/path/to/jdk-11/bin/java
3. Run your Studio
Change the Studio preferences
This will change the JVM used when you build Java code in the Studio (when you create REST API Extension for example).
1. Click on Preferences in the Studio Menu
2. Click on Java in the preferences window
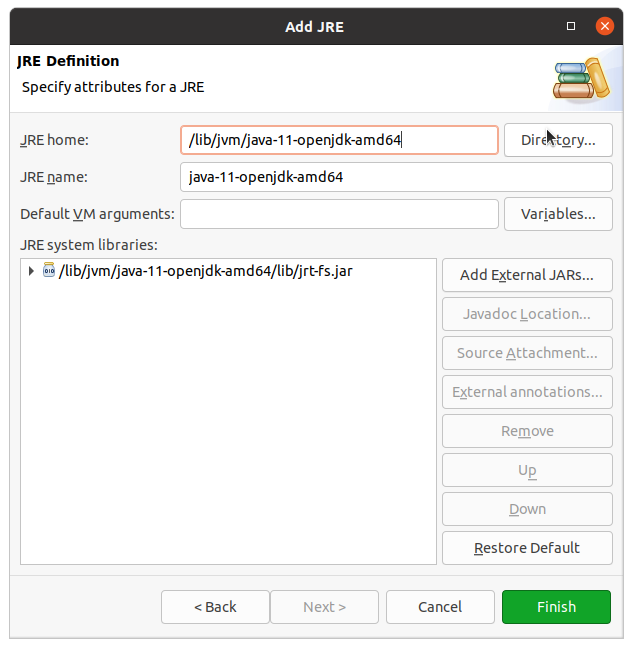
3. In the window, click on the 'Add...' button 4. Select your the path to the new JVM /path/to/jdk-11/bin/java, and save.
In the screenshot below for example, the path is: /usr/lib/jvm/java-11-openjdk-amd64
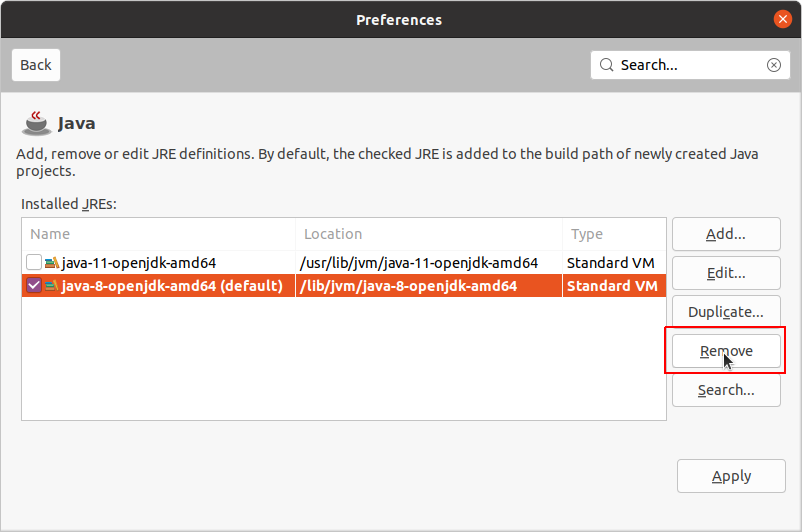
1. Uncheck the default JVM and remove the old one. The newly added one will become the default one. Remove the other JREs not used: